August 13, 2017

SHA2017 writeups: Forensics : Samsung S4 (300)

Last weekend I participated in the SHA2017 CTF https://ctf.sha2017.org/ with my team HackingForSoju. We ended up at third place. Here are the writeups for the levels I solved.

Forensics: Samsung S4 (300)

A forensic investigator was wondering how hacker boxes like RIFF and Z3X use JTAG on a Samsung S4 phone while the main cores have debugging disabled.
The attached file was an archive with the file CTF_SamsungS4.csv, the contents of that file looked like:

Time, tms, tck, tdi, tdo 
0.000000250, 1, 0, 1, 1
0.000000500, 1, 1, 1, 1
0.000000750, 1, 1, 1, 1
0.000001000, 1, 0, 1, 1
0.000001250, 1, 0, 1, 1
0.000001500, 1, 1, 1, 1
0.000001750, 1, 1, 1, 1
...

TMS, TCK, TDI and TDO are the four mandatory signals in the JTAG protocol, and the logfile gives their logical levels over time. There are many tools to analyze logical signals, but I used sigrok and the GUI PulseView. https://sigrok.org/wiki/PulseView

The CSV-file could not be imported to sigrok right away, I had to remove the headers and timestamps:

grep -o ' .*' CTF_SamsungS4.csv | tail -n+2  > stripped.csv

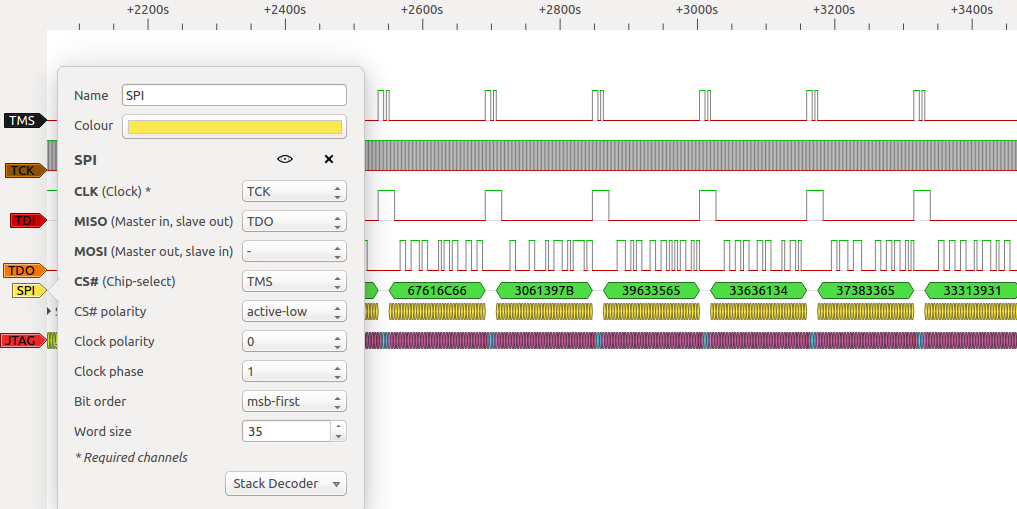
When imported into pulseview, the data looks like this after naming the signals:


The data line TDI shows data going into the device, and TDO holds data that comes out of the device. Note that there is data at TDO between the samples 2500 and 4000. This seems to be an intresting point to look at.

I added a JTAG-decoder to decode what was going on.


The magenta bits indicate that the JTAG state machine is doing SHIFT-DR, the text labels don't show at this zoom level. The data on TDO is the previous content of the data register, we probably want to have a look!

There might be a more elegant solution to get the data out, but as CTFs are under time pressure I just added an extra SPI decoder with TMS as chip select to get the bitstream. Note that there are 35 bits in the SHIFT-DR section, so this width must be changed in the SPI decoder.


This CTF has made me recognize 'FLAG' when written in hex, but the byte order had to be changed:

>>> s = '67616c66 3061397b 39633565 33636134 37383365 33313931 31626130 66633333 31656662 7d38'
>>> ''.join([e.decode('hex')[::-1] for e in s.split()])
'flag{9a0e5c94ac3e38719130ab133cfbfe18}'
>>> 

SHA2017 writeups: Crypto : Stack Overflow (100)

Last weekend I participated in the SHA2017 CTF https://ctf.sha2017.org/with my team HackingForSoju. We ended up at third place. Here are the writeups for the levels I solved.

Crypto : Stack Overflow (100)

I had some issues implementing strong encryption, luckily I was able to find a nice example on stackoverflow that showed me how to do it.
The attached archive contained two files, encrypt.py and flag.pdf.enc.

encrypt.py:

import os, sys
from Crypto.Cipher import AES

fn = sys.argv[1]
data = open(fn,'rb').read()

# Secure CTR mode encryption using random key and random IV, taken from
# http://stackoverflow.com/questions/3154998/pycrypto-problem-using-aesctr
secret = os.urandom(16)
crypto = AES.new(os.urandom(32), AES.MODE_CTR, counter=lambda: secret)

encrypted = crypto.encrypt(data)
open(fn+'.enc','wb').write(encrypted)


This is not a good implementation, as every 16-bit block will be XOR-ed with the same key. It is enough to just know 16 bytes of plaintext to extract the key. The name of the encrypted file suggests that it in a PDF, wich has a predictable file header.

Here is the script I wrote to solve break the key:

# Input data as integers
data = map(ord, open('flag.pdf.enc').read())

# Plaintext, as integers
plain = map(ord, '%PDF-1.3 \n1 0 ob')

# Key is plaintext XOR:ed with ciphertext
key = [a^b for a,b in zip(plain[:16],data)]

# Decrypt and save
msg = [chr(a^b) for a,b in zip(key*len(data), data)]
f = open('flag.pdf','w')
f.write(''.join(msg))
f.close()

The contents of the decrypted file is an image with the flag and an important message:


August 10, 2017

Narrow test clips

Although not really a project, I recently bought a few test clips on Ebay, called "Universal Chip IC Test Clip Socket Adpter Programmer SOP SOIC TSOP MSOP SSOP" http://www.ebay.com/itm/381608877505

This was how they were advertised:

Ships with case and cables


Can connect to IC pins on a circuit board:


I paid 16 dollars for a set of 10 clips, shipping included. They arrived in less than three weeks.
The clips looked as advertised, although the cables smelled strange and the case felt cheap.

The instructions says that the clips are possible to use with one hand,
but I needed two hands to use them.
The one-handed grip does not seem to be nice to the cables.


It works fine to connect the clips to adjacent pins with 50 mil (1.27mm) pin spacing, but I would not try to connect to anything smaller than that and expect it to work.
This is an improvement from the the clips I've had previously, they are unwieldy for anything under 100 mil (2.54mm).
However, I doubt I could connect to a QFP64 package as advertised without causing  a short-circuit to the adjacent pins.

April 24, 2016

How to install windows 7 on a second hard disk drive, and the long way to get there.

This is a diary/worklog that tells the story of installing windows and linux on a second harddrive in a single laptop. I publish this with the hope that it might help others facing the same problems I had.

For a project I am doing, I needed to run some windows software. I use Linux as my main
system usually Fair enough, just use a VM.
I downloaded a Windows 7 32-bit virtual machine as an .ova file at:

https://developer.microsoft.com/en-us/microsoft-edge/tools/vms/linux/

However, the machine was really large and I did not have enough space to install it.
This was because the Virtual Disk size was set to +100 GB, but the actual disk was much smaller than that.

The .ova file is in effect a .tar archive of a .vmdk disk image and a
.ovf xml file. I untared the ova file, had a quick look in the ovf file
and created a new virtual machine using the vmdk disk.

Now I could finally run the machine and install the software I wanted, or no. It required
a 64-bit version of windows. My 32-bit installation of Linux could not run 64-bit VM's.


Installing windows on a second harddrive, how to download from DreamSpark under Linux

I have two harddrives in my laptop, I switched the the optical reader
to a holder for a second drive. I have not really used the second harddrive
yet though.  I'm running 32-bit Linux as my main system on the other drive.

My university makes it possible for students to download some software
from microsoft for free via DreamSpark. I could not do this directly from
Linux though!  You need to do this from a windows system. The virtual machine
I just installed worked fine though.
Soon I had (a legal copy of)
en_windows_7_professional_n_with_sp1_x64_dvd_u_677207.iso
and transfered it to my linux system using a shared folder in Virtual Box.


Loading an ISO with grub

Now, I somehow needed to run a system (real or virtual) connected to both
the installation image and the harddrive.

It seemed like GRUB could boot a disk image:
http://www.howtogeek.com/196933/how-to-boot-linux-iso-images-directly-from-your-hard-drive/
I tried this briefly, but it did not work well for me.


Connecting virtualbox to a physical disk

Maybe I could use virtualbox for the installation?
It is possible to create a vmdk file that is connected to a physical disk.

http://www.serverwatch.com/server-tutorials/using-a-physical-hard-drive-with-a-virtualbox-vm.html

larsh@blaxie:~/VirtualBox VMs$ VBoxManage internalcommands createrawvmdk -filename SecondHDD.vmdk -rawdisk /dev/sdb
RAW host disk access VMDK file SecondHDD.vmdk created successfully.
larsh@blaxie:~/VirtualBox VMs$

Now, just create a virtual machine and connect it to the ISO and the physical
disk. Oh, wait. I need to have a 64 bit virtual machine.


Hosting a 64-bit guest vm on a 32-bit host

This is possible for some processors
https://www.virtualbox.org/manual/ch03.html#intro-64bitguests
if they have the VT-x feature enabled
https://en.wikipedia.org/wiki/X86_virtualization#Intel_virtualization_.28VT-x.29
wich my processor did not have..

larsh@blaxie:~$ cat /proc/cpuinfo  | grep vmx
larsh@blaxie:~$


Back to GRUB

So, trying the GRUB/iso solution once again. Some more research at
http://askubuntu.com/questions/367011/boot-windows-7-iso-from-grub2
showed that others had tried, but failed and resorted to putting the ISO
on a USB stick and then install from there.


Putting a windows ISO on a usb stick

I don't need an elegant solution, I need to get this going.

http://askubuntu.com/questions/289559/how-can-i-create-a-windows-bootable-usb-stick-using-ubuntu

sudo add-apt-repository ppa:colingille/freshlight
sudo apt-get update
sudo apt-get install winusb

larsh@blaxie:~$ sudo winusb --format en_windows_7_professional_n_with_sp1_x64_dvd_u_677207.iso /dev/sdc
Formating device...
Mounting...
mount: block device /home/larsh/en_windows_7_professional_n_with_sp1_x64_dvd_u_677207.iso is write-protected, mounting read-only
Copying...
2%
(took about 20 minutes to complete, the iso was about 2.9 GB)

Using that usb stick to reboot and install on other hdd.


Installing windows from USB stick

This could have been fine, but no. The windows installer did not like the partition
table - and did not want to create a new one nicely...

http://druss.co/2013/10/fix-error-during-installing-windows-7-from-usb-setup-was-unable-to-create-a-system-partition-or-locate-an-existing-partition/

Aaah, I'm getting quite frustrated now. I should give up and install linux64
to be able to run virtualbox with 64 bit instead...


Installing 64-bit linux distro

Downloaded ubuntu-15.10-desktop-amd64.iso and made a bootable usb-stick from
it. Installed 64 bit linux on hdd2, went very smoothly. Booted up and installed virtualbox with apt-get. I now noticed that Virtualbox can not run 64-bit machines, even on 64-bit systems.
Nooooooooo...


Installing 64-bit windows besides linux

I kind of like having a 64-bit linux installation on my laptop as well, so I think I keep
it. But now I need to shrink the partition on the other disk. gparted is
a nice tool! Easy to use! It is a GUI wrapper for may cool commands.

I shrinked the partition I had installed linux64 on and created a new one to
install windows on. Perhaps I have better luck this time.
The output from fdisk for my second disk is now:

   Device Boot      Start         End      Blocks   Id  System
/dev/sdb1   *        2048   204802047   102400000   83  Linux
/dev/sdb2       879118334   976771071    48826369    5  Extended
/dev/sdb3   *   409602048   614402047   102400000    7  HPFS/NTFS/exFAT
/dev/sdb5       879118336   976771071    48826368   82  Linux swap / Solaris

A tutorial at http://druss.co/2014/07/fixed-setup-was-unable-to-create-a-new-system-partition-or-locate-an-existing-system-partition-during-installing-windows-8-18-7-vista-etc-from-usb/ suggested that the installation disk should be copied to the disk, make the partition bootable and then run the installer from the hard disk without having the USB-stick inserted. I tried this.

D:\boot>bootsect.exe /nt60 c:
Target volumes will be updated with BOOTMGR compatible bootcode.

    Successfully updated NTFS filesystem bootcode.

Bootcode was successfully updated on all targeted volumes.
D:\boot>

But now hdd2 needs to have the bootloader updated booting up in 64-bin linux and running update-grub

larsh@blaxie:/media/larsh/1CDCF34FDCF32226$ sudo update-grub
[sudo] password for larsh:
Generating grub configuration file ...
Found linux image: /boot/vmlinuz-4.2.0-16-generic
Found initrd image: /boot/initrd.img-4.2.0-16-generic
Found memtest86+ image: /boot/memtest86+.elf
Found memtest86+ image: /boot/memtest86+.bin
Found Ubuntu 14.04.4 LTS (14.04) on /dev/sda1
Found Windows Recovery Environment (loader) on /dev/sdb2
done

Rebooted without USB stick inserted, and the copied windows installer started fine! But, I still got same error...

Could it be that the windows installer does not like multiple disks?
I opened my laptop, took out hdd1 and rebooted. Installation now worked! :D
I created a new partition to install Windows on, as I had copied the
installation to a partition on the disk.


Making both Linux and Windows bootable

The windows installer overwrote the previous installed grub bootloader,
so I could not boot linux64 bit from hdd2 any more. But maybe I can from
hdd1? Inserted hdd1 again and booted up linux32.
The installation of windows had left hdd2 in this state:

   Device Boot      Start         End      Blocks   Id  System
   /dev/sdb1            2048   204802047   102400000   83  Linux
   /dev/sdb2   *   409602048   614402047   102400000    7  HPFS/NTFS/exFAT
   /dev/sdb3       614402048   879116287   132357120    7  HPFS/NTFS/exFAT
   /dev/sdb4       879118334   976771071    48826369    5  Extended
   /dev/sdb5       879118336   976771071    48826368   82  Linux swap / Solaris

So I made /dev/sdb1 bootable with fdisk, and updated the bootloader in hdd1:

larsh@blaxie:~$ sudo update-grub
Generating grub configuration file ...
Found linux image: /boot/vmlinuz-3.13.0-79-lowlatency
Found initrd image: /boot/initrd.img-3.13.0-79-lowlatency
...
Found linux image: /boot/vmlinuz-3.2.0-61-generic
Found initrd image: /boot/initrd.img-3.2.0-61-generic
Found memtest86+ image: /boot/memtest86+.elf
Found memtest86+ image: /boot/memtest86+.bin
Found Ubuntu 15.10 (15.10) on /dev/sdb1
Found Windows 7 (loader) on /dev/sdb2
done
larsh@blaxie:~$

So I can now boot all my three OS'es from hdd1, but only windows from hdd2.
I'm OK with this solution for now. I will change the bootloader on hdd2 to
grub later. I want my program to work, preferably two days ago.


Getting the program onto the windows disk

This was easy, the windows partition is easily mounted from linux32.
I copied the program to the desktop folder and rebooted into windows,
installation went fine. Now on to what I was supposed to do.


Conclusions

  • It is possible to have three OS'es on two hard disks in a single laptop.
  • Make sure that your processor can virtualize 64-bit systems before you try that.
  • It is hard for the Windows 7 installer to handle multiple disks.

March 22, 2015

Writeups for SWECTF 2015 : CTFBOT och RADIO

I played SWEHACK CTF 2015 this weekend: http://swectf.se/

The competition was individual, I ended up at fourth place after solving seven of the ten challenges. As the competition was in held in swedish, the writeups will also be in Swedish.

Swehack CTF är framtaget av medlemmar i CTF-laget 'Swehack'. Detta med önskan att främja Capture the Flags i Sverige och väcka ett större intresse för denna typ av aktiviter.

Jag vill tacka Swehack för några riktigt roliga och utmanande problem! Här är en beskrivning på hur jag löste mina två första uppgifter.


CTFBot

Säg hej till CTFBot i #swehack @ irc.swehack.org. Botten är blyg så dra ett privat meddelande

Lösning:

Jag var redan inne i chatt-kanalen så det gick fort att lösa denna uppgift, faktiskt lite för fort! Botten hade inte hunnit logga in innan CTF:en drog igång. =)

19:59:44 -!- Irssi: Starting query in swehack with CTFbot
19:59:44 <larsh> hej
19:59:44 -!- CTFbot: No such nick/channel
20:00::42 <larsh> hej
20:00:42 <ctfbot> Valkommen till CTFen: swehack{hello_swehackctf_2015}

RADIO

Vi har fångat in lite radiotrafik från en närliggande ambassad men vi är lite osäkra på vad trafiken faktiskt innehåller .

Binär:http://challs.swectf.se/radio.zip eller http://46.101.50.174/radio.zip
Av: chloe

Lösning:

$ unzip radio.zip
Archive:  radio.zip
  inflating: radio
$ file radio
radio: RIFF (little-endian) data, WAVE audio, Microsoft PCM, 16 bit, stereo 22050 Hz
$ mv radio radio.wav
$ vlc radio.wav


Den uppspelade ljudfilen lät ganska mystiskt, det kan mest beskrivas som ett sorts metalliskt varierande brus. Jag har tidigare lekt lite med spektrografi (att titta på frekvensinnehållet i ljud http://sv.wikipedia.org/wiki/Spektrografi ) och hade därför redan en telefon-app för detta installerad: https://play.google.com/store/apps/details?id=radonsoft.net.spectralview

När jag startade den och höll telefonen mot datorns högtalare visade sig flaggan i spektrumet!


En sak jag lärde mig medan jag skrev ihop den här texten var hur man tar en screenshot på en Android2.2-telefon via adb och usb-kabel, man kopierar framebufferten direkt!

$ adb -d pull /dev/graphics/fb0 fb0
$ ffmpeg -vframes 1 -vcodec rawvideo -f rawvideo -pix_fmt rgb565le -s 480x800 -i fb0 -f image2 -vcodec png screenshot.png


February 20, 2013

GiTS 2013 - Writeup for Crypto250, Rabinsbitch

Last weekend I participated in the GitS 2013 CTF for team Clevcode. Here is my writeup for the crypto 250 challenge, called Rabinsbitch.

The challenge consisted of a python script running on a remote server. The goal was to extract the cryptographic keys from the script.

#
#for the answer take the hash of p,q concatenated together as decimal strings
#such as if p=7,q=11 p being by definition smaller you'd hash the string "711"
#please hash with sha512, thank you and g'luck

import math
import operator
import random,struct
import os,SocketServer
import base64 as b64

def encrypt(m,n):
    c=pow(m,2,n)
    return c
def extended_gcd(a, b):
    if b == 0:
       return (1, 0)
    else:
        (q, r) = (a/b, a%b)
        (s, t) = extended_gcd(b, r)
        return (t, s - q * t)
def invmod(a, p, maxiter=1000000):
    if a == 0:
        raise ValueError('0 has no inverse mod %d' % p)
    r = a
    d = 1
    for i in xrange(min(p, maxiter)):
        d = ((p // r + 1) * d) % p
        r = (d * a) % p
        if r == 1:
            break
    else:
        raise ValueError('%d has no inverse mod %d' % (a, p))
    return d

def reste_chinois(la,lm):
    """
    Return the solution of the Chinese theorem.
    """
    M = reduce(operator.mul, lm)
    lM = [M/mi for mi in lm]
    ly = map(invmod, lM, lm)
    laMy = map((lambda ai, Mi, yi : ai*Mi*yi), la, lM, ly)
    return sum(laMy) % M

def decrypt(c,p,q):
    mp=pow(c,(p+1)/4,p)
    mq=pow(c,(q+1)/4,q)
    r1 = pow(c, (p+1)/4, p)
    r2 = pow(c, (q+1)/4, q)

    return (reste_chinois([r1, r2], [p, q]), \
                reste_chinois([-r1, r2], [p, q]), \
                reste_chinois([r1, -r2], [p, q]), \
                reste_chinois([-r1, -r2], [p, q]))    
p=7
q=11
n=p*q
TEST=True
if TEST:
    m=[]
    for x in xrange(200):
        m.append(random.getrandbits(1200))
    print m[0]
    print len(set(m))
    assert(len(set(m))>2)
    i=0
    print decrypt(3,p,q)
    for x in m:
        enc=encrypt(x,n)
        if i%20==0:
            print "ENCRYPTED IS %r" %enc
        i+=1
        assert(x in decrypt(enc,p,q) )

class  SignHandler(SocketServer.BaseRequestHandler):
    def handle(self):
        req=self.request
  req.sendall("You must first solve a puzzle, a sha1 sum ending in 26 bit's set to 1, it must be of length %s bytes, starting with %s"%(len(proof)+5,proof))
  test=req.recv(21)
  ha=hashlib.sha1()
  ha.update(test)
  if (test[0:16]!=proof or ord(ha.digest()[-1])!=0xff or 
            ord(ha.digest()[-2])!=0xff or
   ord(ha.digest()[-3])!=0xff or
   ord(ha.digest()[-4])&3!=3 
   ):
   req.sendall("NOPE")
   req.close()
   return

        leng=struct.unpack("H",req.recv(2))[0]
        s=""
        while len(s) leng:
            req.sendall("Okaly Doakaly")
            req.close()
            return
        i=0
        s=s[::-1]
        for el in xrange(len(s)):
            i+=(ord(s[el])<<(8*el))
        rets=decrypt(i,p,q)
        for el in rets[:-1]:
            req.sendall(str(el)+",")
        req.sendall(str(rets[-1]))


        req.close()


class ThreadedServer(SocketServer.ThreadingMixIn, SocketServer.TCPServer):
   pass
if __name__ == "__main__" and not TEST:
   HOST, PORT = "", 9955
   server = ThreadedServer((HOST, PORT), SignHandler)
   server.allow_reuse_address = True
   server.serve_forever()

The challenge server first requires the client to compute a proof-of-work to prevent brute-forcing. The client should find a string so that, when concatenated to a seed provided by the server, the last 26 bits of its SHA1 hash are ones. This took approximately one minute with a naive python implementation on the slow machine I had at hand.

The server then accepted an integer c encoded as a byte stream, computed some values using c and returned them. The computations were:

p,q = secret

r1 = c ** (p+1)/4 (mod p)
r2 = c ** (q+1)/4 (mod q)

a, so that  a*r1 = 1 (mod p) and  a*r2 = 1 (mod q)
b, so that b*-r1 = 1 (mod p) and  b*r2 = 1 (mod q)
c, so that  c*r1 = 1 (mod p) and c*-r2 = 1 (mod q)
d, so that d*-r1 = 1 (mod p) and d*-r2 = 1 (mod q)

The hack here is to choose c = 1, then both r1 and r2 becomes 1. d will be congruent to -1 in both modulo p and q, so d = p*q - 1 = M - 1 and M can trivially be computed. We also have that b = p*k - 1 for some integer k. We can now compute p as GCD(M,b-1) and then q=M/p.

The flag were to be computed as the SHA256 hash of the concatenated p and q. This was actually the most problematic part of the problem, due a copy-paste error from the proof-of-work code that used SHA1. The final solution is listed below.

import hashlib, struct
import socket

HOST = 'rabinsbitch.2013.ghostintheshellcode.com'
PORT = 9955

s = socket.socket(socket.AF_INET, socket.SOCK_STREAM)
s.connect((HOST, PORT))
data = s.recv(132)
proof = data.split()[-1]
print proof


test = ''

x = 0
while True:
   ha = hashlib.sha1()
   ha.update(proof + struct.pack("I",x))
   d = ha.digest()
   if d[-3:] == '\xff\xff\xff' and ord(d[-4])&3 == 3:
      test = proof + struct.pack("I",x)
      break
   if d[-2:] == '\xff\xff':
      print "Close..."

   x += 1
   #assert x & (2**32 - 1) != 0, "Could not find matching proof!"

print "Found proof %r" % test

s.send(test)


i = 0x1

toSend =''
while i > 0:
   toSend += chr(i%256)
   i = int(i/256)

datagram = struct.pack('H', len(toSend)) + toSend
s.send(datagram)
result = ''
tmp = 'asdf'
while tmp != '':
   tmp = s.recv(999)
   result += tmp

#result = "1,16941066001474695845719308384813140784186795259157054765289986998445863711720505625812362392697741205506049415906549237302653271360565551697039440068630125139408726686167733805604385582596700326652668377493932061724923381450000827786706063473133681438897765791275734911181038668585952430992240545833488889467911361773431544879600184386683684500892680154414816031266754352400273467267938247266548887205133112948093607346676644817468289304022898908247554057630196442472940983356348803549279910983869343866117264685687034360294868608260912165854176452135379353057412438116196758723769316960521491688495464097529269456197,5634409376365928014416246503986138236992108737039947072941477791958438637877531730514281925969449690964163598045979764319142248921381193502060187717633426958368050694066134300481039643146320871981320853532778576589804902495007704046087597562459337727373717481169459494040528451601731742862806515204023196360495905604537025264792329270035269210755345238017503967990869306160108267542185442376337836021860709096121093532913732125456749131910969411738108129561943901454827954858124025207923012141584943546695856004655276250645522524369645338890458467726951800793914414373991692269936254513675131200905511369778088032944,22575475377840623860135554888799279021178903996197001838231464790404302349598037356326644318667190896470213013952529001621795520281946745199099627786263552097776777380233868106085425225743021198633989231026710638314728283945008531832793661035593019166271483272445194405221567120187684173855047061037512085828407267377968570144392513656718953711648025392432319999257623658560381734810123689642886723226993822044214700879590376942925038435933868319985662187192140343927768938214472828757202923125454287412813120690342310610940391132630557504744634919862331153851326852490188450993705571474196622889400975467307357489140"

[a,b,c,d] = map(int, result.split(','))

M = d+1
pk = b+1

from fractions import gcd

p = gcd(M,pk)
q = M/p

toHash = 'p=0x%x,q=0x%x'%(p,q)
print toHash

ha = hashlib.sha256()
ha.update(toHash)
print 'Solution:', ha.digest().encode('hex')

I liked the proof-of-work mechanism, there were no problems with overloaded servers. See you all at the Codegate quals in early March!

November 29, 2012

MSP430 LaunchPi - expansion board for the Raspberry Pi


So I got my Raspberry Pi a few days ago. (Time from order to delivery was one business day from http://lawicel-shop.se/ .) As I have been playing a bit with the MSP430 Launchpad lately, I thought it would be nice to interface MSP430 microcontrollers with the Raspi. Why not make an expansion board? Inspired by the MSP430 Launchpad, this is what I ended up with:


The expansion board, which I would like to call the MSP430 LaunchPi, is fully pin-compatible with the normal Launchpad (except for the touchbutton, wich I never used anyway). The TX/RX pins are easy to connect with the Raspi UART (GPIO pins 8 and 10) and all GPIO pins from the Raspi are accessable.

Just as on the original Launchpad, the leds and uart connections are configurable using jumpers or double female connectors.

I plan to create a hardware driver for mspdebug to be able to program the board using the GPIO pins 11 and 13 on the Raspi.


Building process

The time from idea to finished board was approximately four hours, the priority was to make something that worked. The design was done using pen and paper.
 In hindsight, it would have been easier to use wirewrap female headers (Arduino stackable) but I used normal female headers with bent legs and soldered these on the solder side of the board.
 I accidentally cut one copper strip, the one leading 3.3 V from the header. Fixed it with some wire.
 I wanted more space on the top of the board to be able to easily change the microcontrollers, so I chose to mount a 47k SMD resistor on the soldering side to pull-up the reset pin.
 After soldering headers, leds, jumpers and resistors, I connected it to the Launchpad. It worked! =)

Plugged in the Raspi. The Test and Reset pins of the MSP430 does not like the default state of the Raspi GPIO pins 11 and 13, so these are disconnected for now.

I had problems connecting to the serial port at first, this was because a getty was connected to the serial port. I disabled this in the file /etc/inittab and rebooted the Raspi.

pi@raspberrypi ~ $ tail -3 /etc/inittab
#Spawn a getty on Raspberry Pi serial line
#Commented out for use with the MSP430 LaunchPi
#T0:23:respawn:/sbin/getty -L ttyAMA0 115200 vt100
pi@raspberrypi ~ $


I had previously loaded the MSP430 with a UART test program (source code available at https://github.com/LarsH/msp430-uart).

pi@raspberrypi ~ $ screen /dev/ttyAMA0 9600

...

Unknown command.
>>>?
Uart test program
Commands:
r: blink red led
g: blink green led
t: read temperature sensor
?: print this help
>>>r
Blinking red led...
>>>g
Blinking green led...
>>>t
Temperature: d6b4
>>>


Success!

Finally I noticed that I forgot to make the green led optional, I resoldered the board a bit to make it possible to disconnect. I also moved the resistor so that I can use the led with another pin and a double female connector. Here are pictures of the final board. Wire colors are red/black for 3V/Gnd, green/yellow for UART Rx/Tx and blue/white for reset pull-up/green led.